Showing posts with label Breads. Show all posts

Monday, February 8, 2010

Bread Machine Cinnamon Rolls

My two oldest boys are in the Junior High youth group at our church and this past Sunday was my turn to take in a snack for the whole group of teens. So I asked my guys what they wanted me to make for taking in to share.  Their response: "homemade cinnamon rolls!"  I thought to myself that it was doable because I had all the ingredients to make them however, I didn't want to take too much time doing LOTS and LOTS by hand!  So I pulled out my recipe book that came with my bread machine and found a cinnamon roll recipe!  I was able to make four batches of cinnamon rolls over the course of two days and those batches made enough to feed about 25 teens and youth leaders along with my family of 7!!

I remembered not to work the dough to much and not spread it out too thin before putting on the filling and rolling up the dough!  They were able to rise and looked wonderful!!

Bread Machine Cinnamon Rolls

3/4 cup + 2 tbsp. warm milk (80°)
1 large egg
3 cups bread flour
3 tbsp. sugar
1/2 tsp. salt
4 tbsp. butter or margarine
2 tsp. bread machine or active dry yeast

Place ingredients in the bread machine according to the machine's manual.  Program for DOUGH.  When it is done, roll dough out to about a 15x10 inch rectangle.

Spread 1/3 cup softened butter over dough. Sprinkle 1/3 cup sugar(I used brown sugar), 2-3 tsp. cinnamon and 1/2 cup chopped nuts(optional) over the softened butter.

Roll up the dough with the long side of the dough. Cut with a knife or with dental floss(preferred way!).  Place rolls in a 9x13 greased pan.  Let rolls rise in the pan for 45 minutes - 1 hour or until double in size.

Bake in oven at 375° for 20 - 25 minutes or until golden brown.

While waiting the rolls to cool and if desired, mix up the frosting: 1 cup powdered sugar, 1-2 tbsp. milk and 1/2 tsp. vanilla. Drizzle over the rolls. Enjoy!  Makes 12 rolls.

Notes: To warm the milk, I put it on my microwave for 45 seconds on high power. The measurements for the filling is approximate because I just spread and sprinkled the filling ingredients to cover the dough decently.  Flossing the rolls makes for much nicer rolls!!  I poured the ingredients for the frosting into a ziploc sandwich bag and then "kneaded" the bag until the ingredients were mixed thoroughly. Then I clipped a bottom corner to drizzle the frosting onto the rolls.

This post is linked to:

Friday, September 18, 2009

Homemade Bagels

I have tried many different bagel recipes over the last couple of years and I think I finally found one that I can handle and do without too much difficulty. I love the fact that my kids can help do these as well so it doesn't take all day to make them. If there is any left after a couple of days, I slice them and then put them in the freezer so they are an easy pull for a breakfast.

I got the recipe originally from my friend Debbie but I have taken the time to tweak it a bit for my family.

BAGELS

1 cup water or thawed frozen juice concentrate (can also use potato water if you kept some from when you cook pototoes, or boil one potato in 2 c water and measure out a cup)

1 Tbsp or package yeast

1 Tbsp honey

4 cup flour(you can use part or all whole wheat flour)

1 Tbsp salt

1 egg

1 egg, separated (reserve yolk for egg wash)

3 Tbsp oil

  1. Proof yeast in 1/2 cup of water and 1 Tbsp honey. How to proof the yeast...In a small bowl, proof the yeast with a tablespoonful of sugar or honey, and very warm water. "Lukewarm" it's called - I always thought that meant barely warm but actually it means almost hot. Run the water over the inside of your wrist - it should feel warm but not unbearable. Stir the three ingredients together and let sit about five minutes. Here's why you do it in a small bowl: if it doesn't froth and bubble, but dissolves and lies flat or doesn't dissolve at all, you've either killed it or failed to activate it. Dump it out and begin again. This way you've only wasted a bit of yeast rather than a bowlful of flour, etc.

  2. Add 1/2 cup of liquid, salt, egg, egg white and 2 c flour to the yeast once it is proof. Stir.

  3. Add additional flour till dough isn't too sticky and can be kneaded and knead 8-10 minutes by hand or with mixer.

  4. Let dough rise till doubled.

  5. Bring 3 quarts water to a boil in a large pot and preheat oven to 425°.

  6. Punch down dough, knead a little and divide into 12 pieces. Shape into bagels. Instead of rolling it out and joining to seal ends - I find they fall apart too easily that way. I roll them into a ball, flatten it, and then make an opening in the middle with my fingers, stretching the dough carefully as I do so.

  7. Let stand about 10 minutes on oiled surface.

  8. Use a slotted spoon to slide each bagel into pot of boiling water. Do NOT crowd. I do them in my wok and found that I can get four at a time in the water. Boil 2 minutes on each side, then place carefully on greased baking sheet (they will be very slippery!)

  9. Egg wash: Mix egg yolk with 1 tsp water and brush on each bagel. Sprinkle with coarse salt, poppy or sesame seeds or minced onion, if desired.

  10. Bake for 20-25 minutes until golden brown.


To make other flavors:


  • Cinnamon-Raisin: I have added 1-2 Tbsp. cinnamon and 1/2-3/4 cup raisins to the dough.

  • Strawberry: thaw frozen strawberries--save the juice from thawing and use as part or all of the water. Mash a few strawberries(around 1/2 cup) to put in the dough.

  • Blueberry: thaw frozen blueberries and use juice from thawing for part of the liquid. Put in 1 cup blueberries.

  • Cinnamon/Sugar: skip the egg wash and when they come out of the oven brush with melted butter and then roll in a cinnamon/sugar mixture.


This post is linked to:

Friday, July 24, 2009

Fresh Strawberry Muffins


Tis the season to have LOTS of fresh fruit in the house, however, I have several family members that will not eat many fresh fruits--maybe an apple or banana if I am lucky! Which means that when I have fresh fruit in the house it might take a while for those us who like fruit to eat it.

I had purchased 3lbs of strawberries a couple of weeks ago on price drop at Meijer for 99¢/lb. My oldest son and I are the only ones that eat the strawberries fresh and so I chopped them up and we ate some of them fresh. After a few days though they started to get a little mushy so I decided to use them up before they went bad and make some fresh strawberry muffins for the first time.

I used Nancy's fresh strawberry muffin recipe as my guide and went to work creating a yummy healthy muffin!

Here is my recipe:

Fresh Strawberry Muffins

1/2 cup butter, softened
1/2 cup margarine, softened
2 eggs
4 cups flour (2 cups white, 2 cups wheat)
4 tsps. baking powder
1 tsp. salt
1 cup buttermilk
1/2 cup sour cream
1 tsp. vanilla
3 cups chopped strawberries
6 tsps. sugar
1 tsp. cinnamon

Cream butter and sugar. Add eggs and mix well. Sift flour, baking powder and salt in a small bowl. Add flour mixture and milk alternately to butter mixture. Add sour cream and vanilla. Gently stir in strawberries. Scoop batter into muffin pans. Combine sugar and cinnamon and sprinkle over muffins. Bake at 400° for 20-25 minutes. Makes 2 1/2 dozen.

Notes: I made 2 dozen muffins and 1 small quick bread loaf. Allow to cool before eating! As you can see from my picture above, they are a bit crumbly if you try to eat them right out of the oven!

This post is linked at:

Friday, July 17, 2009

Mom's Zucchini Bread

Looking for something to make with all that zucchini or crookneck/yellow squash that is coming out of your garden???

I have got a yummy recipe for you!! It is my Mom's Zucchini Bread recipe and it is very moist and delicious! If you don't want yellow or green flecks in your bread, just peel the skin off the squash.

Mom's Zucchini Bread

3 cups flour
3 eggs
1 cup oil
2 cup sugar
3 tsp. cinnamon
1 tsp. baking soda
1 tsp. salt
1/4 tsp. baking powder
1 tsp. vanilla
2 cup grated zucchini
1 cup nuts(walnuts are best!)

In a large bowl, combine sugar, oil and eggs. Mix well. Add zucchini. Combine dry ingredients; add them to the wet mixture, mix well. Pour into two greased and floured 9in x 5in x 3in loaf pans. Bake at 350° for 60 minutes or until bread tests done.

Notes: These can easy be done as muffins too! Either use paper liners or grease the muffin tins. Also bake at 350° for half the time(30 minutes). This bread or muffins freezes wonderfully!

This post is linked at:

Tuesday, July 7, 2009

Simple, Filling, and Frugal Meal

One day last week I made my chicken rice casserole and then on another day I made some plain rice as a side. I did not use all the package of chicken when making the casserole so I cooked it to have as chicken sandwiches for lunch on another day. So Sunday night rolls around and I have just a small portion leftover of the casserole, some of the plain rice leftover and some of the cooked chicken breasts leftover! Despite the fact that it was 80° outside I decided to fix a light dinner of chicken rice soup using up those leftovers in the fridge. To make the meal a little more substantial, I fixed mini grilled cheese sandwiches using two of the mini loaves of bread that I had put in the freezer during my baking day last week.

Here is the recipe for the soup if I were going to make it from scratch! Using the leftovers that I had on hand, I just had to add 2 cans of chicken broth, 1 can of water, 1 can cream of chicken soup(because of using the plain rice), more cooked carrots, and spices to taste.

Chicken Rice Soup

6 cups chicken broth
4-5 carrots, cooked and diced
1 can cream of chicken soup
3-4 chicken breasts, cooked and diced
1/2 can milk(I use the cream of chicken soup can for my measuring cup!)
3-4 cups of water
5-6 cups of cooked rice
2 tsp. pepper
3 tsp. garlic powder
3 Tbsp. minced onion
4 chicken bouillon cubes
1 tsp. poultry seasoning

Put all the ingredients together in a stockpot and simmer for an hour for the flavors to blend. OR you can put it altogether in the crockpot on low for 3-4 hours.


Taking the bread out of the freezer, I thawed in the microwave just enough to slice it into thin slices. I was able to get 7 sandwiches out of each loaf of bread. I used 1/2 of a slice of Kraft American cheese slices on each sandwich. I much prefer mild cheddar cheese slices for my grilled cheese sandwiches but I did not have any on hand!

I used this recipe and just used the dough cycle...

Honey Oatmeal Bread (breadmachine)

11 1/2 ounces(1 1/4 cup + 3tbsp.) water (80°F)

3 tablespoons honey
3 1/4 cups bread flour
1 cup oats, (quick or old fashioned)
2 tablespoons dry milk
1 1/2 teaspoons salt
2 tablespoons butter or margarine
2 1/4 teaspoons active dry yeast(can be used in the breadmachine)
OR
2 teaspoons bread machine/fast rise yeast

Place in bread machine in order starting with water and ending with yeast.Basic Bread Setting, unless using fast rise yeast then you can do Basic Rapid Bread Setting. Makes 2lb loaf

***If you want rolls instead of a loaf of bread, place the bread machine on dough setting. After the cycle is done, take the dough out of the machine and make into 12-24 balls(depending on what size rolls you would like) place into a greased pan. Or for mini loaves divide evenly into 4 balls and roll out into a log and place in a greased loaf pan. Let rise til double in size(45 minutes-1 hour). Bake in oven at 350° for 15-20 minutes or til golden brown.


Using leftovers out of the fridge, what I had on hand in the pantry, and what I had stored away in the freezer, I was able to make a simple, filling, frugal dinner meal for us in about a half hour.

This post is linked at:

Tuesday, June 2, 2009

Chocolate Chip Bread

Looking for something other than chocolate chip cookies??? This quick bread can be a great substitute!! It is very easy to make into loaves or muffins!


Chocolate Chip Bread

Ingredients

  • 4 cups all-purpose flour
  • 1 cup granulated sugar
  • 1 teaspoon baking powder
  • 1 tablespoon baking soda
  • 1 teaspoon salt
  • 2 large eggs
  • 1 3/4 cups milk
  • 2/3 cup vegetable oil
  • 1 1/2 cups (9 oz.) chocolate chips(I prefer milk chocolate)
  • 1 1/2 cups chopped walnuts(optional)
Directions
PREHEAT oven to 350° F. Grease two 9 x 5-inch loaf pans.

COMBINE flour, sugar, baking powder, baking soda and salt in large bowl. Combine eggs, milk and vegetable oil in medium bowl. Add to flour mixture; mix just until moistened. Stir in morsels and nuts. Spoon into prepared loaf pans.

BAKE for 55 to 60 minutes or until wooden pick inserted in center comes out clean. Cool in pans for 10 minutes; remove from pans. Cool on wire racks.

NOTES: If you are looking for even more chocolate flavor, drizzle or spread the cooled loaves with chocolate! Microwave 1/2 cup chocolate chips in heavy-duty plastic bag on HIGH (100%) power for 45 seconds; knead bag to mix. Microwave for an additional 10- to 20-second intervals, kneading until smooth. Cut a small hole in corner of bag; squeeze to drizzle over bread. If you don't want to use a plastic bag just melt chocolate chips in a bowl and use a knife to spread some melted chocolate on top. Personally, I love to spread the chocolate on top so that when I cut the loaves each slice has an extra kick of chocolate. However, if you are looking for elegant loaves, drizzling is the best option.

This post is linked at:
  • Tasty Tuesday at Balancing Beauty and Bedlam!
  • Tempt My Tummy Tuesday over at Blessed with Grace!
  • I am Blissfully Domestic at Blissfully Domestic!

  • Monday, April 27, 2009

    Italian Herb Bread(breadmachine)


    Italian Herb Bread

    1 1/4 cups + 3 tbsp. water, 80°F
    4 cups bread flour
    1 tbsp. dry milk powder
    2 tbsp. sugar
    1 1/2 tsp. salt
    2 tbsp. grated parmesan cheese(I used the green can cheese)
    1 1/2 tsp. italian seasoning
    2 tbsp. butter or margarine
    2 1/4 tsp. active dry yeast(or 2 tsp. breadmachine/fast rise yeast)

    Put the ingredients in your bread pan according to your bread machine manual.  Put your machine on "french" setting and let the machine do all the work for you!  This will make a 2lb loaf!

    I decided though to set my machine to the "dough" setting and let the machine just do the mixing and rising of the dough.  Once the dough cycle was done, I took the dough out of the machine and divided it into four balls and rolled it out into four small loaves and stuck in my mini loaf pans to rise again for about 1 hour.  After the hour, I baked in the oven at 350° for 20-25 minutes or until golden brown.  Once the loaves were done, I cooled on a cooling rack before slicing to make my "spiced garlic bread".  I slice it and then butter each side and place on a cookie sheet.  Sprinkle with garlic powder and grated parmesan cheese.  Stick back into the oven at 400° for 5-7 minutes until golden brown. 

    If you make the dough rather than a loaf of bread, you can also divide it up into 12-16 balls and then roll out into ropes to make breadsticks. 

    This bread is a great side addition to a nice spaghetti dinner, or alfredo dish or homemade pizza!

    This post is linked at:


    Sunday, March 22, 2009

    Scrumptious Sunday--Corn Muffin Mix


    In my effort to go to everything made from scratch, I have been slowly taking away boxed mixes of muffins or cakes(meaing not buying them any more!). So several weeks ago, I was on a quest to find a homemade corn muffin that tasted very similar to what you buy in the little blue & white box so that I could fix some corn muffins to go along with one of my favorite pantry meals.    In my quest, I tried several different recipes but none of them quite tasted that great to me. They were either too sweet or very dry or not "yellow" enough.  So I did another search online for a possible copycat recipe of the Jiffy corn muffin mix!  WHY I did not think to type in "copycat recipe for jiffy corn muffin mix" in the first place is beyond me!

    With my search I found a recipe that is now a mainstay in my menu line up.  This recipe you can make ahead and even double or triple the recipe to suit your needs.  It is even an easy one to follow for the kids to help you whip up.


    INGREDIENTS

    2/3 cup all purpose flour
    1/2 cup yellow corn meal
    3 Tbsp granulated sugar
    1 Tbsp baking powder
    1/4 tsp salt
    2 Tbsp vegetable oil
    1 egg
    1/3 cup milk

    INSTRUCTIONS

    Combine flour, corn meal, sugar, baking powder and salt. Mix well with whisk. Whisk in vegetable oil and mix until dry mixture is smooth and lumps are gone.

    If you wish to make Corn Muffins:

    Preheat oven to 400 degrees F. Combine above mixture with egg and milk. Mix well.
    Fill muffin tins 1/2 full. Bake 15-20 minutes.
    Makes 6 muffins.

    For more Scrumptious recipes; head over to Happy to be at Home's Scrumptious Sunday Recipe Swap!


    Saturday, February 21, 2009

    Scrumptious Sunday--Strawberry Muffins


    I love these muffins because they are versatile in that you can change the kind of berries and yogurt you use in the batter!  I have done these using blueberry yogurt and blueberries. I have also done blackberries with raspberry yogurt. You can also use frozen berries not just fresh. 

    Strawberry Streusel Muffins
    • 2 cups all-purpose flour
    • 3/4 cup sugar
    • 1 teaspoon cream of tartar
    • 1/2 teaspoon baking soda
    • 1/2 teaspoon salt
    • 2 eggs
    • 3/4 cup strawberry yogurt
    • 1/4 cup sour cream
    • 1 cup chopped fresh strawberries

    • STREUSEL TOPPING:
    • 1/4 cup packed brown sugar
    • 5 tablespoons all-purpose flour
    • 1/2 teaspoon ground cinnamon
    • 2 tablespoons cold butter
    In a large bowl, combine the flour, sugar, cream of tartar, baking soda and salt. In another bowl, combine eggs, yogurt and sour cream; stir into dry ingredients just until moistened. Fold in strawberries. Fill greased or paper-lined muffin cups two-thirds full.      For topping, combine the brown sugar, flour and cinnamon in a bowl; cut in butter until mixture resembles coarse crumbs. Sprinkle over batter.      Bake at 350° for 30-35 minutes or until a toothpick comes out clean. Cool for 5 minutes before removing from pan to a wire rack. Yield: 1 dozen. 

    For more scrumptious recipes, head over Happy to be at Home!

    **photo courtesy of Taste of Home

    Thursday, February 19, 2009

    Recipe Swap--Signature Dish--Jewish Coffee Cake

    Today is the Ultimate Recipe Swap at Life as a Mom.  She is asking us to share our signature dish. The first thing that came to mind when I was thinking "signature dish" was a recipe that I got from my Mother that I love to make for my family.  I don't make it very often because it is a little bit on the expensive side to create.  My hubby loves it so much that he will ask for this or something chocolate when he needs to bring something to a work function.  It is called Jewish Coffee Cake!   I am sure where the "Jewish" part came from in the name but at any rate it is great to eat with a cup of tea(or coffee--I don't drink it!) for a breakfast or afternoon snack.  I have seen similar recipes that just call this dish--"sour cream coffee cake".


    ½ lb. butter (or 1 stick margarine & ½ cup butter)
    6 lg. eggs (or 4 duck eggs)
    1 tsp. baking soda
    2 cups sour cream
    2 cups sugar
    4 cups flour (3 cups white flour and 1 cup whole wheat flour)
    1 ½ tsp. baking powder
    1 tsp. vanilla (not imitation)

    FILLING:
    1 cup nuts, finely chopped (pecans are the best!)
    ½ cup dark brown sugar (can use light brown sugar as well)
    1 tbsp. cinnamon

    Mix filling ingredients together; set aside. To prepare coffee cake, cream together butter and sugar; add vanilla. Add eggs, 1 at a time, beating well after each addition. In a separate bowl sift together flour, baking powder, and baking soda. Add dry ingredients to creamed mixture alternately with sour cream. Mix well. Alternate cake mix with filling in a bundt pan. Bake at 350° on bottom rack 1 hour or until toothpick comes out clean.

    Notes: If you use duck eggs, do not use chicken eggs too!! Using fresh eggs and sour cream the cake will rise over the pan!!! So you will need to be careful when baking, I usually put it on the top rack in the middle of the oven and only bake the cake. You can use all margarine and no butter with this recipe as well. I have used 1 cup of plain yogurt and 1 cup of sour cream for the 2 cups of sour cream. I have also used cottage cheese that I have put through the blender with some lemon juice and buttermilk. (home made sour cream! lol)

    For other signature dishes, head over to the Ultimate Recipe Swap at Life as Mom!

    **originally posted October, 2007

    Tuesday, February 10, 2009

    Oatmeal Muffins


    OATMEAL MUFFINS 

    This is a quadruple batch, should make about 40 muffins, depending on size. I got this recipe from a friend a while ago.  I love making these muffins up because I can have a variety of muffins in very little time. Paula asked me if these freeze well...the answer is yes they do!!  I allow them to cool completely and then stick them in a ziploc gallon size freezer bag and stash away in the freezer. Something else that I have done is take the time to individually wrap the muffins and then stick in the ziploc freezer bag so it is just an easy pull for sticking in a "on-the-go lunch". 

    3 C whole wheat flour
    2 1/3 flour
    3 C oats (quick or whole)
    8 tsp. baking powder
    4 eggs
    3 C milk (I sub water often)
    1 C oil
    1 1/3 white or brown sugar

    Add-in options:

    Chopped apple
    Chocolate chips
    Raisins
    Dried fruit
    Chunk of cream cheese in each
    Dollop of jelly in the middle

    Bake at 400 for 20 min or until golden.


    For other tempting tummy recipes and more; head over to Blessed with Grace!
    For other kitchen tips, head over to Tammy's Recipes! This post is also linked at Blissfully Domestic


    Sunday, January 25, 2009

    Scrumptious Sunday--Apple Cider Doughnuts

    I found this recipe in a Taste of Home Magazine and just love it!  It is very flavorful! 

    Apple Cider Donuts

    • 2/3 cup packed brown sugar
    • 2 eggs
    • 1 teaspoon ground nutmeg
    • 3/4 teaspoon salt
    • 1/4 teaspoon ground cinnamon
    • 1/4 teaspoon ground allspice
    • 1/4 teaspoon ground cardamom
    • 6 tablespoons butter, melted and cooled
    • 1 cup apple cider
    • 3 cups all-purpose flour
    • 1/2 cup whole wheat flour
    • 2 teaspoons baking powder
    • 1/2 teaspoon baking soda
    • Oil for deep-fat frying
    • Confectioners' sugar, optional
    In a mixing bowl, beat the first seven ingredients until thick, about 5 minutes. Gradually beat in butter, then cider. Combine flours, baking powder and baking soda. Add to batter; beat just until blended. Cover and refrigerate 1 hour. Divide dough in half. Turn onto a lightly floured surface; pat to 1/2-in. thickness. Cut with a floured 2-1/2-in. doughnut cutter. Repeat with remaining dough. In an electric skillet or deep-fat fryer, heat oil to 375° degrees. Fry doughnuts, a few at a time, for 2 minutes per side. Drain on paper towels. Dust with confectioners' sugar if desired.

    I usually will make the dough at night and refrigerate it until I use it in the morning. 

    For more scrumptious recipes, head over to Happy to be at Home.

    Tuesday, January 13, 2009

    Homemade Pizza Crust & Breadsticks Success

    I haven't made homemade pizza dough and breadsticks in a while because my hubby has complained to me about the salty taste of the pizza.  So last night, I decided to put my no rise yeast dough recipe to the test!  I have used the recipe for rolls before but hadn't even thought about using the no rise yeast dough recipe for pizza crust. 


    So I made up the dough and made breadsticks first.  Here is the steps I did for the breadsticks...
    1. Once the dough was mixed up, I divided it into 3 parts.(later I would realize that I could have divided it more!)
    2. I took one part of the dough and rolled out the dough into a rectangle shape.
    3. I took my pizza cutter and sliced the dough into stripes.
    4. I melted 3 TBSP. margarine once melted I added 2-3 tsp. garlic powder and stirred the two together making a garlic butter sauce. 
    5. I took my slicone brush and brushed the garlic butter sauce on the stripes of dough. 
    6. I sprinkled grated parmesan cheese liberally over the dough. 
    7. I put the dough into the oven at 400° for 10-15 minutes. and the end result.....


    After doing the bread sticks, I took the other two parts of the dough and rolled them out for a large and medium size pizza. I used my large Pampered Chef pizza stone and my regular size Pampered Chef pizza stone.   With using my stones I decided not to grease them.   I cooked the dough on the stones for about 10 minutes BEFORE adding the toppings. This will help eliminate soggy crusts! When I took the crusts out after cooking them that is when I realized that I probably could have made three pizza crusts from the two crusts that I had done. 


    At any rate, the pizza turned out delicious!! The picture above shows you what was left of my two pizzas! The crust was definitely still a thick crust rather than thin crust but it wasn't too doughy and still got rave reviews from the family!  Hubby also commented  that the pizza tasted a lot less salty than my previous attempts at homemade pizza! 

    So I think I have finally found a new pizza dough for my family! Now to find a pizza sauce that doesn't taste salty but still has flavor! 

    For more kitchen tips, ideas or recipes; head over to Tammy's Recipes OR head over to Blessed with Grace

    Also check out the weekly round-up of great posts over at Blissfully Domestic!
    i am bd bread

    Tuesday, January 6, 2009

    Mini Bread Fun


    I got this idea from Tammy showing us her mini loaves!  I have small pans to do quick breads in and so over the holidays I made several loaves of bread--mini style or kid size! The main reason why I did them is because I thought they would be good size for giving away with my goodie plates.


    Well like most of my recipes, my family thinks that they need to try them out!  So I made a few for us to have as a side with our dinner meals.  The mini loaves do not last long around here!


    And then of course, my daughter loves grilled cheese and she asked if I would use some of "her name size" sandwiches.  I told her sure why not!  And not only did she enjoy them but everyone enjoyed a grilled cheese sandwich on homemade bread with a bowl of homemade chicken rice soup!

    I used this recipe and just used the dough cycle...


    Honey Oatmeal Bread (breadmachine)

    11 1/2 ounces(1 1/4 cup + 3tbsp.) water (80°F) 

    3 tablespoons honey
    3 1/4 cups bread flour
    1 cup oats, (quick or old fashioned)
    2 tablespoons dry milk
    1 1/2 teaspoons salt
    2 tablespoons butter or margarine
    2 1/4 teaspoons active dry yeast(can be used in the breadmachine) 
    OR
    2 teaspoons bread machine/fast rise yeast
    Place in bread machine in order starting with water and ending with yeast.Basic Bread Setting, unless using fast rise yeast then you can do Basic Rapid Bread Setting. Makes 2lb loaf
    ***If you want rolls instead of a loaf of bread, place the bread machine on dough setting. After the cycle is done, take the dough out of the machine and make into 12-24 balls(depending on what size rolls you would like) place into a greased pan. Or for mini loaves divide evenly into 4 balls and roll out into a log and place in a greased loaf pan. Let rise til double in size(45 minutes-1 hour). Bake in oven at 350° for 15-20 minutes or til golden brown.


    For more kitchen tips head over to Tammy's Recipes or for more tempt my tummy tuesdays head over to Blessed with Grace.  I also joined in on the over at Blissfully Domestic!

    Tuesday, December 30, 2008

    No Rise Yeast Dough


    I got this recipe from a friend about a year ago and let me tell you that it can make life so much easier in the bread department of your kitchen!! Make it up and have a big batch of it sitting in the fridge to use with meals as the week progresses! OR make up the big batch, cook 'em and have the different rolls or breads to put in the freezer for the week. And the best part is you do not have to wait for them to rise!


    NO RISE YEAST DOUGH RECIPE

    Mix and let sit for about 15 minutes.
    1 Tbs. yeast
    1/2 C warm water
    1 Tbs. sugar

    Then add the following:

    1/2 C. oil
    2 C. *sour milk, buttermilk, or yogurt
    1/2 C. sugar (or less)
    1/2 tsp. soda
    5 tsp. baking powder
    1 tsp. salt
    5 C. plain flour (maybe need a little more I use about 6 cups)

    *1 cup sour milk= 1 cup of plain milk with 1 tablespoon of white vinegar or lemon juice* THIS NEEDS TO SIT AT LEAST 10 MINUTES TO CLABBER.

    GLAZE RECIPE FOLLOWS AT END!!


    Mix and knead well. Place in a oiled bowl. This dough will keep in the fridge for a least a while if a tight lid is in place. Just take out the amount needed to be used at the time. This dough can be used immediately. There is no waiting for it to rise.

    This dough can be used for the following: dinner rolls, cinnamon rolls, apple rolls, hot dog buns, hamburger buns, dough nut holes, pigs in blankets. Just use your imagination for different recipe uses.

    Donut holes:
    just pinch off a small amount and roll into a ball then fry in hot oil. after frying glaze them and let them drip on a cookie cooling rack. Place a paper towel or wax type paper and you can use the dripped icing over again.

    Donuts:
    Roll out dough then cut with cutter then carefully drop the donuts into hot oil to fry them until they are floating and golden in color. Drain on paper towels then glaze or dust them with powdered sugar or however you would like.

    Cinnamon rolls:
    roll out into a rectangle; spread melted butter/margarine and sprinkle cinnamon and sugar on it. Then roll up from the small end and cut. Cutting the dough with string, thread, or dental floss will give you a clean cut. These can be baked with sides touching or as separate rolls. Bake in about 375-400 degree oven.

    Apple Rolls:
    Make dough as you would for cinnamon rolls but instead of spreading butter and cinnamon you will spread an apple filling on the dough. Apple filling recipe follows after glaze recipe.
    Bake these rolls like you would cinnamon rolls.

    Bread sticks:
    roll small amounts in long strips about the size of your finger and 8" long. Put these on a cookie sheet. Brush with egg white and sprinkle with sesame seeds or poppy seeds and bake at 400.

    Pizza dough:
    with greased hands, flatten dough to fit greased pizza pans but bake the crust about 5 minutes to keep the crust from getting soggy. Place your favorite toppings on the crust and finish baking!

    Hot dog and hamburger buns: just shape them and bake them on cookie sheets

    ICING FOR CINNAMON ROLLS AND DONUT HOLES:
    1/2 cup conf. sugar,
    *1 Tbs. corn starch*
    1/4 tsp. vanilla and
    1 Tbs. boiling water

    **the cornstarch is optional**** THIS MAKES A SMALL AMOUT OF GLAZE BUT IF YOU PLACE THE RACK OVER A SHEET OF WAX OR FREEZER PAPER YOU CAN SCRAPE THE EXCESS OFF AND REUSE IT.

    APPLE FILLING:
    Cover peeled and cut up apples with sugar and allow this to rest over night to create its own juice. Simmer this until thick and apples are tender. You can also add cinnamon to this mixture. Never boil the apple mixture as it will burn easily. I always start the cooking process on the simmer setting/fire.

    For more kitchen tips, ideas or recipes; head over to Tammy's Recipes OR head over to Blessed with Grace!

    Tuesday, December 9, 2008

    Pumpkin Cheesecake Bread


    I love pumpkin roll however, I don't always want to take the time to make one up! Well, I found a solution that is just as good! I call it Pumpkin Cheesecake Bread! I have taken the original recipe and added a cheesecake "filling" to it!

    Here is the recipe...

    3 1/3 cups flour(I usually do half white & half whole wheat)
    2 tsp. baking soda
    1 1/2 tsp. ground cinnamon
    1/2 tsp. ground ginger
    1/2 tsp. ground cloves
    3/4 tsp salt
    2 2/3 cups sugar
    2/3 cup canola oil
    1 can(15oz) unsweetened pumpkin
    2 egg

    For cheesecake:
    1-8oz cream cheese, softened
    1 egg
    1 tsp. vanilla
    1 tsp. lemon juice
    1/3 cup sugar


    Preheat oven to 350°. Grease and flour a loaf pans. Sift together first 5 ingredients; stir in salt.

    Combine sugar, oil, and pumpkin in a large bowl; beat at medium speed with an electric mixer until smooth. Add egg, beating until well blended. Gradually add dry ingredients, beating at a low speed until blended. Transfer batter to prepared pans.

    In a separate bowl, mix up the ingredients for the cheesecake until creamy.

    The bread batter is thick enough to create a channel down the center to pour in the cream cheese mixture.

    Bake at 350° for 55 minutes or until loaf is golden brown and a wooden pick comes out clean. Let cool in pan on a wire rack 15 minutes; remove from pan. Serve warm or at room temperature. Makes 2 loaves

    You can do this without the cheesecake filling and then use it in some pumpkin spice bread pudding!!

    For other tempting tummy recipes and more; head over to Blessed with Grace!

    For other kitchen tips, recipes and more; head over to Tammy's Recipes!!

    Monday, November 24, 2008

    Kitchen Tip Tuesday


    I love using "Texas Toast" for garlic toast and french toast. It makes things quick and easy to do. On Sunday I took half the loaf and made it into garlic toast to go with our spaghetti and meatball dinner.

    Then on Monday morning I took the time to make french toast with the rest of the loaf plus another whole loaf. We ate some for breakfast and the rest went into the freezer for a breakfast next week.


    I especially like using the thicker slices for french toast. I even use the end pieces, however, I take my bread knife and carefully cut off the very end of the piece. This way the egg mixture soaks in on both sides of the bread. Yes it makes the pieces not as thick as the rest of the pieces but those thinner pieces work well for my little ones.

    Also using the thicker slices it is easier to make homemade french toast sticks. I cut the slices of bread into thirds before dipping into the egg mixture.

    To answer a question in the comments...I cook the french toast, let it cool and then freeze. To use the french toast out of the freezer...stick in the toaster for a couple of minutes(my toaster is set on 3) then heat in the microwave for 30 seconds. Doing the toaster then the microwave makes it where the toast isn't so tough to eat.

    For other kitchen tips, recipes and more; head over to Tammy's Recipes!!

    Saturday, November 15, 2008

    Scrumptious Sunday--OJ Muffins


    ORANGE JUICE MUFFINS

    1 egg
    ½ cup buttermilk
    1/3 cup frozen orange juice concentrate, thawed
    1/3 cup margarine, melted
    1 2/3 cups flour
    ½ cup sugar
    1 tsp. baking soda
    ¼ tsp. baking powder
    ¼ tsp. salt

    Combine flour, sugar, baking soda, baking powder, and salt together in a large bowl. Combine the egg, buttermilk, orange juice concentrate and melted margarine in a separate bowl. Add the wet ingredients to the dry ingredients. Stir until batter is moistened but still lumpy.

    Lightly spray 12 muffin cups with vegetable oil spray. Fill the muffin cups ¾ full with batter. Bake in a 400° oven for 20 minutes or until muffins are golden brown. Yields 12 muffins

    Notes: Can use veggie oil instead of melted margarine. Can also make into bread loaves just adjust baking time.

    Tuesday, October 28, 2008

    Smelling like Fall!

    Today the temps around here were in the high 30s! You look out my windows and you can see the leaves changing! You step outside and breathe in the crisp, cool air! Fall is definitely here in my part of the country!

    So I am now getting in the baking mood! Today I focused on the pumpkin smell in my house!!


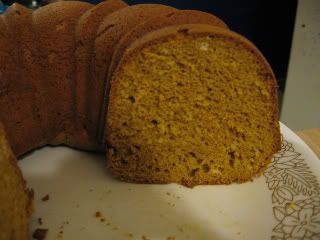
    I made this awesome moist pumpkin bundt cake! It has a mild pumpkin flavor and just melts in your mouth! The kids had it for snack today hence the cake being half gone already!


    Since I opened just a 15 oz can of pumpkin I didn't have enough for another "big batch" of something so I found a recipe for pumpkin muffins over at Hillbilly Housewife that only called for 1 cup of pumpkin! So I baked up that recipe! Of course, I changed a couple of things in the recipe! I didn't have quite a full cup of pumpkin to put in the batter sooooo I used 1/4 cup of cooked butternut squash along with 3/4 cup of pumpkin to get my 1 cup of pumpkin! I also did not use a 1/3 cup of melted margarine but instead used 1/3 cup of unsweetened applesauce!! The muffins will make a good compliment to breakfast in the morning!

    Both of these recipes made my house smell soooo good and fall-like!

    Go take a look at the many other Harvest or Halloween type recipes over at Life as a Mom or share some of your own!!

    More of Sonshine's Fall Recipe Collection

    Autumn Pumpkin Bundt Cake


    Autumn Pumpkin Bundt Cake

    1 box yellow cake mix

    1 pkg(3.4oz) box instant butterscotch pudding mix

    4 eggs

    1/4 cup water

    1/4 cup veggie oil(or applesauce)

    1 cup canned pumpkin

    2 tsp. pumpkin pie spice

    Whipping cream, optional

    Preheat oven to 350°. Grease and flour a 10 inch bundt pan.

    Using an electric mixer, combine the cake and pudding mixes, eggs, water, oil, pumpkin and pumpkin pie spice and beat on low speed for 30 seconds; then increase the speed to medium and beat for 4 minutes. Pour the batter into the prepared pan.

    Bake in the preheated 350° oven for 50-55 minutes or until a toothpick inserted in the center of the cake comes out clean. Cool the cake in the pan for 15 minutes before removing to wire rack to cool completely. If desired, serve with whipped cream.

    Sonshine's notes: I did not preheat the oven! I did not flour the bundt pan! I used applesauce and not the veggie oil. Once I took it out of the oven I waited about 5 minutes and turned the cake out on a plate and set it on my cooking rack. The batter is thicker than regular cake! However, this cake is moist and melts in your mouth!

    Also for other tempting tummy recipes and more; head over to Blessed with Grace!